

Jul 09, 2020
In a series of blog posts we will focus on some of the best practices we use within Merapar to evolve our DevOps practices we have built around the AWS platform. Why? Because we think it’s fun to share knowledge and to learn from others in the industry.
Situation
Within our Merapar AWS Organisation we want to centrally manage who has access to which account and with which level of access. Next to the accounts managed within our own AWS organisation we also want to control the access to the accounts within the AWS organisations of our customers from the Merapar AWS organisation.
Amazon Web Services released the AWS SSO service, which makes it possible to integrate with our company’s G-Suite, to setup identity federation and manage the AWS account access via G-Suite. In this blog we will discuss the different security concepts we use and how access AWS Console and AWS CLI across the integrated system.
Overview
The following picture depicts the setup we are using:
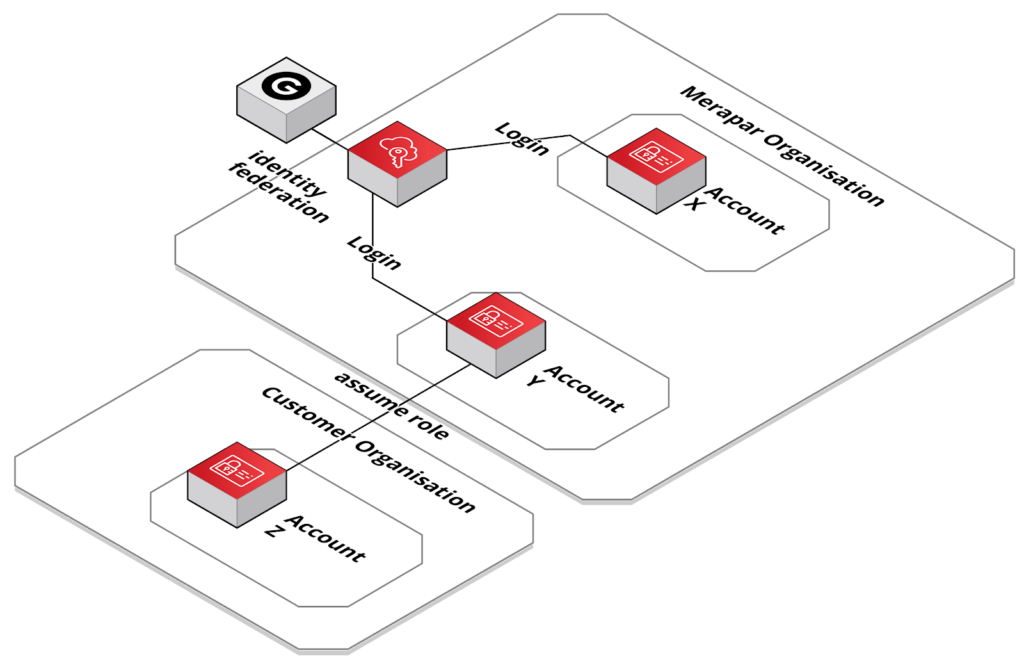
This provides the following features:
- We can login with our GSuite account into AWS, which enforces MFA and password policies as set by our organisation.
- Our administrators can manage the account membership / roles we are allowed to assume.
- We create bastion AWS accounts (like Account Y) to enable access to customer accounts in the customers AWS organisation.
Note: This AWS guide provides you all information on how to link your identity provider to the AWS SSO service.
AWS CLI Access
With the above mentioned setup, we can still access all accounts with the AWS CLI. To achieve this the following setup is required:
To configure a new account
- Make sure you have the AWS CLI version 2
- Run
aws -version. If version 1 is installed, update to version 2, see AWS CLI v2 install Guide - Run
aws configure sso - SSO start URL: https://<your app>.awsapps.com/start
- SSO region: <your app region>
- Select the account and role you want to use
- Select a default region and output format
- Define a CLI profile name so you can use this configuration later on
This configuration add the following entry to your AWS config file (~/.aws/config):
[profile CLI_profile_name]
sso_start_url = https://<your app>.awsapps.com/start
sso_region = <your app region>
sso_account_id = <account id>
sso_role_name = <role>
region = <default CLI region>
output = <default CLI output>
Access an already configured account
- Set the profile you want to use:
export AWS_PROFILE=CLI_profile_name - Login to the account:
aws sso login - You are now logged-in and can access the account. For example, show the caller identity via:
aws sts get-caller-identity
More info: https://docs.aws.amazon.com/cli/latest/userguide/cli-configure-sso.html
Access to a linked account
To access a linked account (e.g. Account Z in the overview) add the following entry to the AWS config file (~/.aws/config):
[profile CLI_profile_account_z]
source_profile=CLI_profile_name
role_arn=arn:aws:iam::<id account z>:role/<role>
Now this account can be used by using export AWS_PROFILE=CLI_profile_account_z.
AWS Console Access
You can access the directly linked accounts by going to the SSO start URL, this provides you with an account selection (and a way to directly download access credentials).
When logged in directly to account Y, we can “hop” to account Z by performing the following actions:
Once logged in, you can change a to a different account by:
Clicking on AWSReservedSSO_x_xx in the right upper cornerSelect “Switch role”Provide the account id (in our case of account Z), and role you want to assumeClick “Switch role”
Now you are actually in the AWS console of account Z and can, depending on the role’s permissions, perform the actions required.